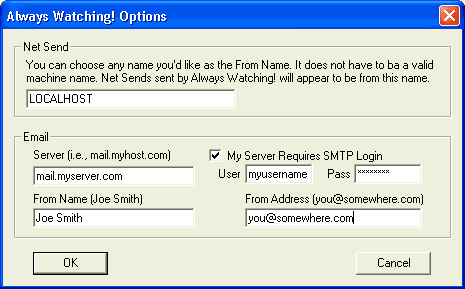
| The Always Watching!™ Options Dialog |
|---|
|
The options dialog is the place to set the information that Always
Watching! needs to operate properly.
 It is highly recommended that you
fill out each relevant field. It is highly recommended that you
fill out each relevant field.NetSend
Always Watching!™ can use the Windows networking Net Send protocol to inform you of Watch Notifications. Net Send requires an address to send to, which is customized for each Watch Item in the Add/Edit Dialog. Net Send also can take a From "address". This is the value you'll set here
in the Options Dialog. By default, your computer name will appear in this
textbox. If you'd like to have your net sends appear to be from some other
name, enter a value here. The name does not have to be the name of an existing
computer, and can be any arbitrary text.
Email
The email options will allow you to set options for email delivery of Watch Notifications via the internet. Information is needed for delivery purposes that can be obtained from your ISP, if needed. However, in most cases, your existing email programs account options can provide all the clues you need to fill out this information. Server
This option signifies the location of your outgoing SMTP mail server. This information is usually obtained from your ISP. My Server Requires SMTP Login and User & Pass
Options
Many ISPs require a username and password on their outgoing SMTP mail server to prevent spammers and other non-customers from using the server for unauthorized activities. If your ISP requires a username and password, check the My Server Requires SMTP Login checkbox and fill in the user and pass fields with your username and password, respectively. Your email Watch Notifications can appear to be from any name and address
that you'd like. The only exception to this rule is if your ISP does not allow
the "from" address to be from outside the network. In that case, you'll have to
use the From Address that your ISP assigned you. In all other cases,
enter a name and email address that you'd like your Watch Notifications to
appear to be from.
Saving your options
Press Ok when you have filled out the appropriate options to save them. |